Recursive Turtles
Objectives
- Build an in depth understanding of recursion using turtles
Background
First, you’ll see how your version of Python interacts with turtle graphics.
Start by creating a new file in your text-editor named rec-turtle.py. Paste into your new file this top-of-file comment and example function, tri(n):
Then, to try this out:
From your python prompt, type from rec-turtle import tri.
Then, type tri(3).
You should see the turtle appear and draw a triangle…
Then, try closing the window.
If everything works (and the python prompt returns responsively), great!
If this does not run, type done()—then try closing the window. If things go
crazily wrong, you can always kill the python console with
Ctrl-D or the terminal with Ctrl-C.
After you type done() you might lose your python prompt until you close the
window. Ask for help if you’re running into trouble or other oddities.
It seems that, for many people, they need to run each turtle-drawing command twice! Every other run seems to be actually resetting the turtle. If you see an error that says Terminator—running again is (most likely) all you need! Try running again in this case.
Advanced Turtling
First, change your tri function and re-run it in order to try some of the many turtle options:
Line thickness
Put the line
width(10)as the first overall line of the function, or put the linewidth(2*n+1)as the first line of theelseblock.Colorfulness
Put the line
color('darkgreen')as the first line of the function. Or put the two lines:
as the first lines of the function.
This colors page lists the various colors available.
In addition, you can create your own colors, e.g.,
clr = (0.8, 0.6, 0.0), followed bycolor(clr), creates an gold-ish color, with red at 0.8 strength (out of 1), green at 0.6 out of 1, and blue at 0.0 out of 1.Turtle shape
Put the line
shape('turtle')as the first line of the function.This library reference lists the default shapes.
Other Python turtle-drawing commands
Put the line
dot(10, 'red')as the first line of theelseblock.This should draw a filled circle (a dot) just before it runs the other lines of the
elseblock.Note that you can make the dot a different color than the line color by including the color as the second argument to dot.
Here is the complete turtle reference page
Big picture: The tri example demonstrates single-path recursion: the recursive calls are made a single time, so that there is a single, step-by-step path taken.
The exercise
Problem 1: The Spiral Function
Next, you’ll build another single-path recursive function, spiral. It will be very similar to tri.
To begin, underneath the tri function, write another named spiral. Here is its signature, and outline, with docstring, for easy copy-and-paste:
Here’s a picture from the call spiral(100, 90, 0.9)
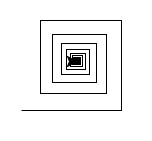
The spiral function should use the turtle drawing functions to create a spiral that:
- Draws its first segment of length initialLength, and then
- Turns angle degrees to the left after that segment, and then
- Calls spiral recursively, using multiplier to change its first argument (the second and third arguments won’t change!)
For example,
- With a multiplier of 0.5 each side in the spiral should be half the length of the previous side (getting smaller)
- with a multiplier of 1.5 each side in the spiral should be one and a half times the length of the previous side (getting larger)
Base cases!
For your base cases, have spiral stop drawing—just with return—when it has reached a side length of
- Less than 1 pixel (this one is already implemented, above!) or
- Greater than 1000 pixels
- You can use
or initial_length ...in the same base-case test, above, to implement this.
- You can use
For example, try some of these calls:
spiral(100, 90, 0.9)spiral(100, 170, 0.95)# More of a “star” (hit control-c to stop…)spiral(400, 120, 0.8)# A triangular spiral…spiral(2, 1, 0.999)# An ACTUAL spiral (again, control-c to stop…)
Problem 2: The chai function and branching recursion
Next, you’ll build a branching-recursion example. When branching, recursion is at its most “magical.” However, it’s also true that in writing, branching recursion can be the most mind-bending! What’s remarkable is that the “magic,” in the end, reveals all of its tricks: it’s fully understandable.
Start by pasting the chai function:
Then, try running it with chai(100)
Next, add one branch of recursion to chai:
- Paste this recursive call:
chai(size/2)between the two calls toright(90)
Try it out!
Next, add a second branch.
It’s nothing more than a second branch, but because it’s called recursively on all of the subbranches, the resulting work (and visual intricacy) is more than just doubled!
To add this second branch, you should
- Paste a second recursive call to
chai(size/2)between the two calls toleft(90)
Again, try it out!
In the end, branching recursion works by creating a smaller version of the overall structure at more than one location within that structure.
The key to making “branching recursion” work is making sure that your turtle ends at the same location that it begins, and ends up facing the same direction. That is how you ensure that the statements after the recursive calls are moving the turtle as expected.
Problem 3: The svtree function
Next, you’ll write another branching example: the side-view tree. Here, “branching” seems like a particularly appropriate descriptor!
The idea here is to create a function that draws the side-view of a tree, hence svtree. Read over this docstring in order to get a sense of the two arguments. Then, look over the outline and images below:
Before diving in, take a look at two examples and some analysis. First, here is an example of the output from my function when svtree(128, 6) is run:
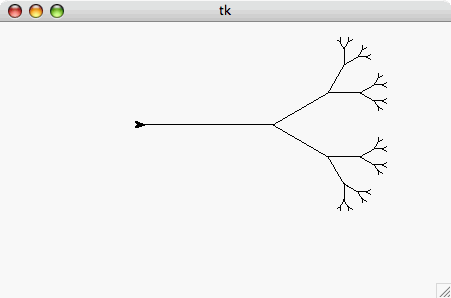
Note that this is really side view! Here is an example of the possible output when svtree(50, 2) is run:
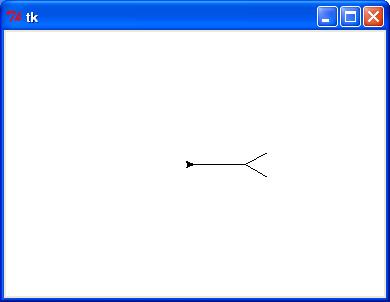
Also, if svtree(50, 0) is run, the result should be no drawing at all. The base case occurs when levels equals 0.
Hints and analysis
Base case: for svtree, you want to draw nothing (and return from svtree) when levels == 0.
Recursive case: We tackle it conceptually.
Here is a picture showing the self-similar breakdown of svtree. This is, in fact, an almost complete map of the svtree code!
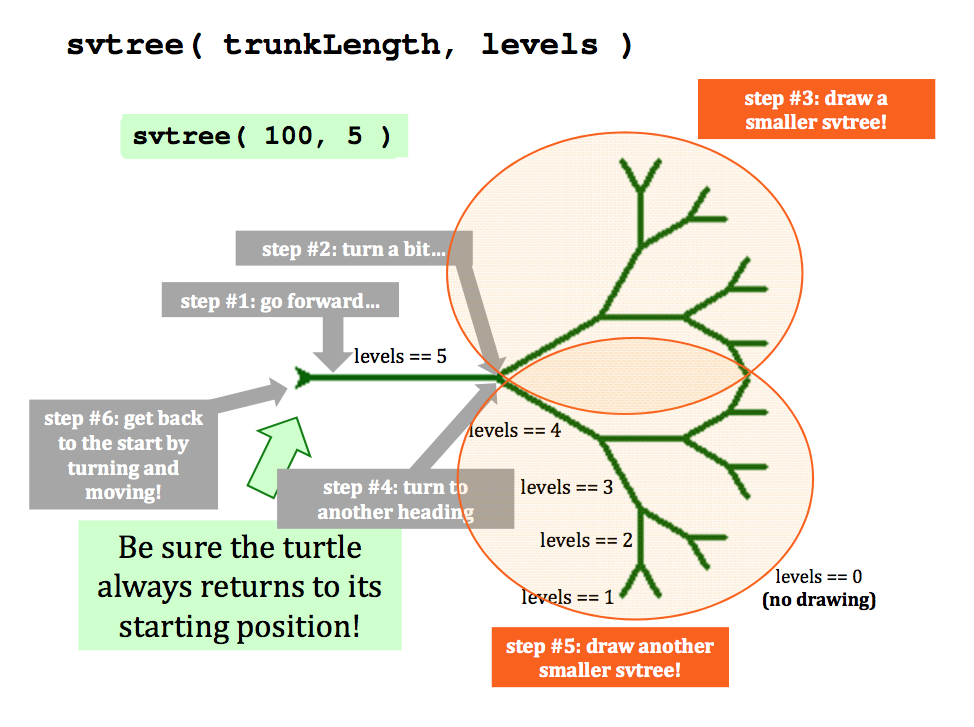 The key to happiness with recursive drawing is this: the pen must be back at the start (root) of the tree at the end of the function call, and the turtle must be facing in the original direction! That way, each portion of the recursion “takes care of itself” relative to the other parts of the image.
Here are the steps:
- Go forward the
trunklength. - Turn left some amount.
- Recur! (call
svtreewith a fraction of thetrunklengthand 1 fewer levels). - Turn right some amount (if you want to be symmetric, turn right double the amount you turned left).
- Recur again! (make the same call to
svtreewith a fraction of thetrunklengthand 1 fewer levels). - Finish up, part 1: Turn left so that the turtle is facing its original direction (usually the same as the original left turn).
- finish up, part 2: Go backward the original
trunklength.
Again, here is a code-based sketch of how svtree will work:
Don’t worry about the exact angle of branching or the amount of reduction of the trunklength in sub-branches, etc.
Design your own tree by making aesthetic choices for each of these.
Calling left(90); svtree(100, 5) will yield a more traditional, skyward, tree pose!
Once you have the svtree function working, alter it so that it has three or more branches, instead of only two…
- You can get some very dense “foliage” very quickly.
- Even more “life-like” results are possible if you use non-identical branching angles and size multipliers.
- Also, you could have the
widthorcolordepend on the value of levels. - If you make the final “level” red, you can create an apple tree.
- See the
dotexample fromtrifor other ways to add fruit.
- See the
- Or, if you make that final “level” a random color, you can produce fall-foliage-type effects…
Problem 4: The snowflake and flakeside functions
A challenge! The Koch Snowflake is an example of very deeply branching recursion.
The Koch snowflake is a fractal with three identical sides—it’s the sides themselves that are defined recursively, not the triangle.
Because of this, we provide the overall snowflake function for you to use—it’s here. Feel free to copy-and-paste:
Note that you can’t use this until you define flakeside—that’s next.
Your task is to implement flakeside(sidelength, levels), which will draw one snowflake side.
First, here is a graphical summary of a snowflake side’s structure:
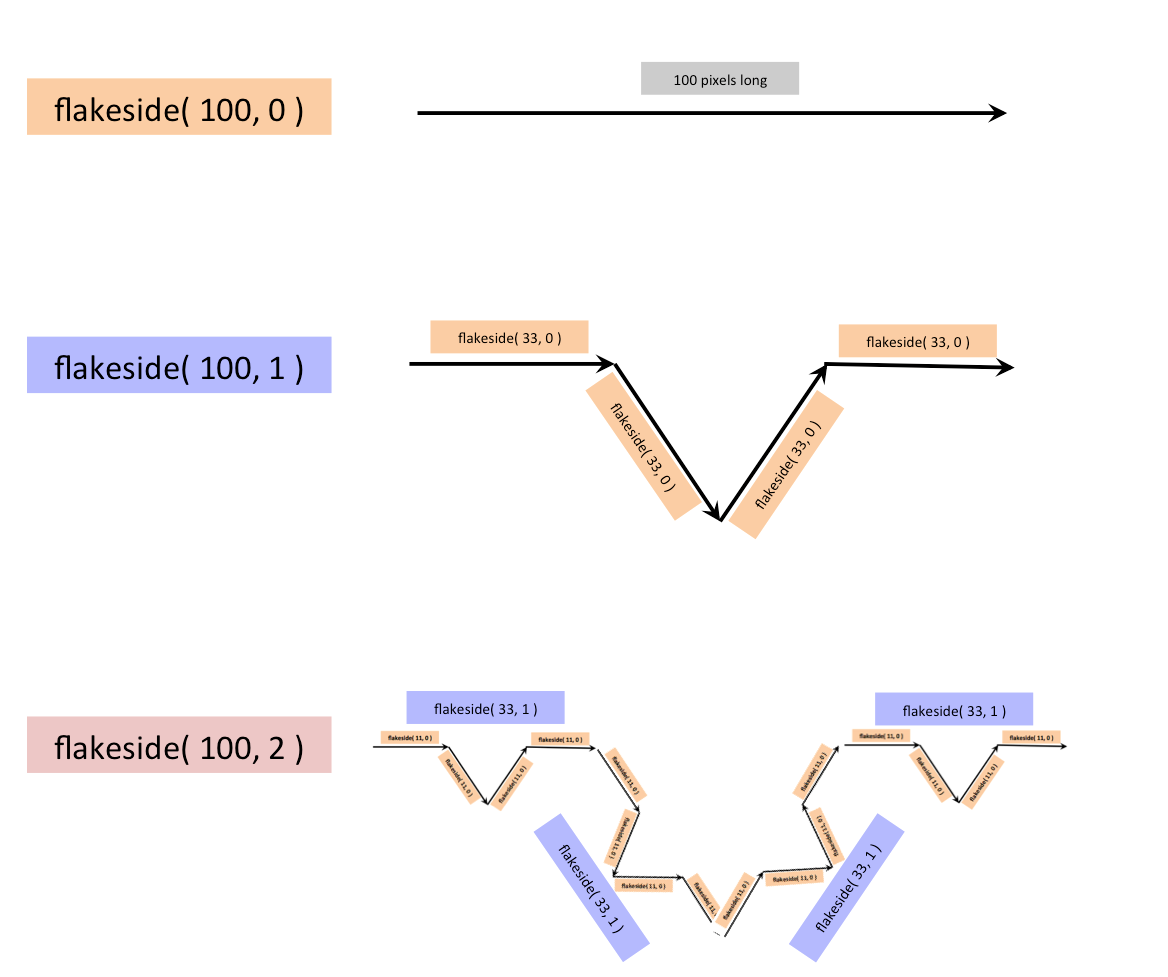
A base-case Koch snowflake side is simply a straight line of length sidelength! Each recursive level replaces the middle third of the snowflake’s side with a “bump,” i.e., two sides that would be part of a one-third-scale equilateral triangle. Notice there are four subsides to each flakeside. This means that flakeside will call itself recursively four times! At the three spots between those four calls, there will be an appropriate turn… Thus, the recursive case will include seven total lines (4 recursions and three turns).
Once your flakeside function works, try out snowflake!
The snowflake function simply calls flakeside three times.
Depending on the directions that flakeside uses, you may need to change the lefts in snowflake to rights.
Examples to try might include snowflake(300, 2) and snowflake(300, 3)
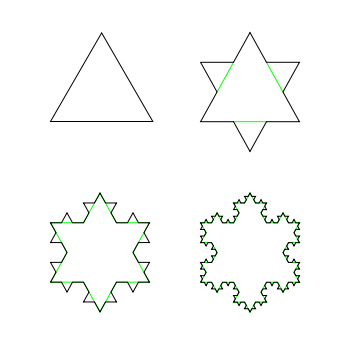
Here are images of four different values of levels for a snowflake, 0, 1, 2, and 3:
You can learn much more about the Koch snowflake fractal curve by searching the Internet!